skip to main |
skip to sidebar
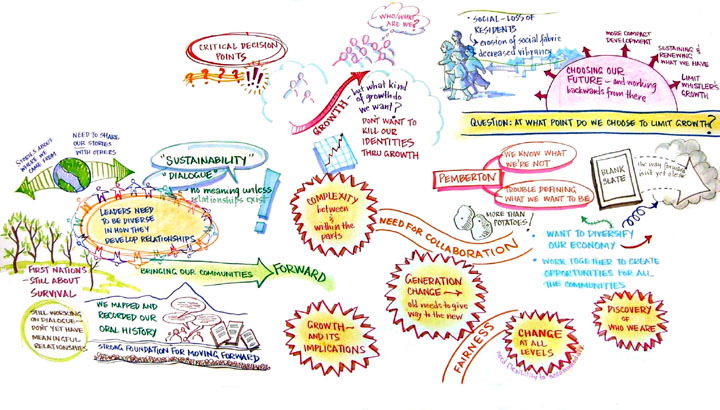
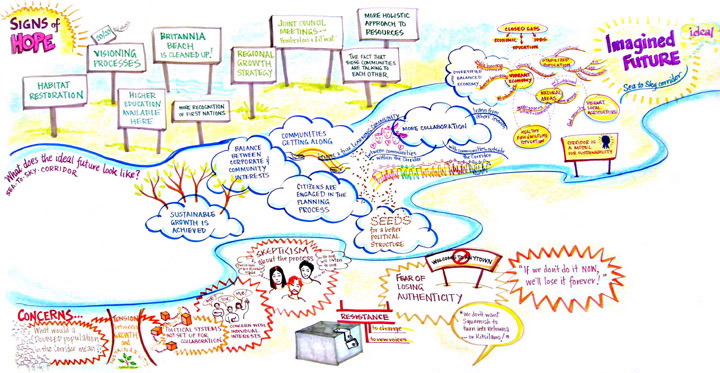
A couple of entries ago I expressed a hope that I'd get permission to post the drawings from a session I did up in Whistler with the Imagine BC Sea-to-Sky group. Well, I got permission, so here are the drawings: (click on a picture to view a larger image)
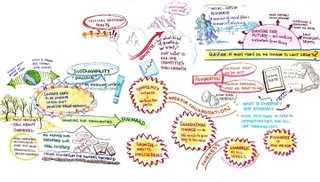
Confession: the top drawing is just a detail, not the whole sheet. When I looked at the original with a critical eye I realized it was kind of chaotic — the information from one area spilled over into another area so it was difficult to distinguish between the discrete parts. So I just posted the good bits here! The bottom drawing is better organized, I think — but then, I had the advantage of doing that one a bit after the fact, whereas the one above was done "live" as people were talking. That's the big challenge, trying to organize ideas and information that's flying at you thick and fast.
My mentor Christina Merkley subsequently coached me on how to organize information better on the page, with frames, heads and subheads, bullets, separator lines and so on. I tried to put those ideas into practice in my Sechelt drawings (Charrette Syndrome, below), and think I was fairly successful.
Another day, another lesson learned…
I'm so excited — I have just learned to lighten up!
"What are you talking about?" say those who know me. "You're one of the lightest people we know!" (As in light-hearted…and perhaps, at times, somewhat light-headed.) No, no, no. I'm not talking about me. I'm talking about my photos. Yes, folks, I just learned a terrific technique to lighten up the photos I take of my work, so that the background knocks out to white and the colours pop out brightly and clearly.
Not sure what I'm talking about? Well, a picture is worth a thousand words — so here's a picture to explain. Or rather, in this case, two pictures — the Before and After shot.

Quite a difference, no? The Before shot, on the left, is just how it came out of my camera. Which, because of imperfect lighting and the fact that the camera picks up all the gradations of light and shadow on the paper, comes out kind of grey. The After shot, on the right, is how it looks after I doctored it up with this nifty technique I learned a couple of days ago. Amazing, eh?
And it's not even difficult. A huge thank-you goes to Peter Durand of Alphachimp Studio in Pittsburgh. Peter edits the blog for the Center for Graphic Facilitation, which is a treasure trove of good information and ideas for people working in this field. Maybe he runs the Center too — or maybe the blog is the Center. I'm not too sure. Anyway, I registered as a GF on his site and asked him about cleaning up digital photos of drawings. I had learned about some software called Whiteboard, but it turns out not to be Mac-compatible (boo!!), so I wondered if there was some other way to do the job without having to shell out an awful lot of money to buy Virtual PC to make my computer compatible with the software… you get the general idea.
Well, there was! Apparently Peter had given a demo at the 2006 Visual Practitioners Conference on just this topic, and he generously shared the information with me. And you can learn it too, because it's posted on his blog: click here to get the tutorial.
So now of course I'm sitting up till all hours of the night obsessively cleaning up all my drawings. And as I do, I will replace the old ones on my blog with the fresh new versions — and give thanks to the generosity of all the mentors out there who are helping the rest of us do our work better each day.